Sending welcome email to new employee
A welcome email invites an employee to access your company account in TimeOff.Management.
You can send the email:
- immediately when creating the employee
- later, after you have finished setting up their profile
Sending the invite later can be useful when you want to check the employee’s department, schedule, allowance, and approval route first.
Before sending the welcome email
Check that the employee profile is ready.
Confirm:
- the employee’s name
- their email address
- department
- location
- work schedule or rota
- manager or leave approver
- allowance or PTO setup
- leave type access
A correct email address is especially important. The invitation will be sent to the address saved in the employee profile.
Read more: Adding, editing, and deleting users
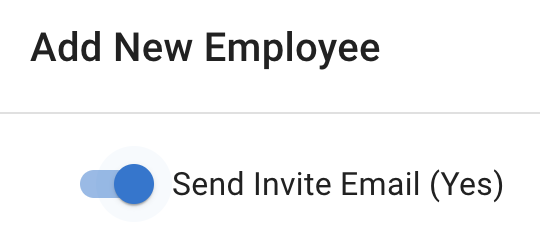
Option 1: Send the welcome email immediately
You can send the invitation while creating a new employee.
To do this:
- Go to Employees.
- Select Add Employee.
- Enter the employee’s details.
- Turn on Send invite email at the top of the page.
- Check the employee’s email address.
- Select Save changes.
The employee profile will be created and the welcome email will be sent.
Use this option when the employee profile and company settings are already complete.
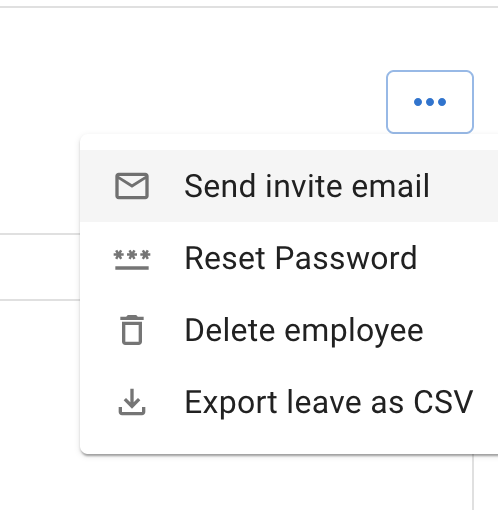
Option 2: Send the welcome email later
You can create the employee first and send the invitation later.
This gives you time to finish setting up:
- employee details
- department and location
- work schedule
- rota
- allowance
- manager or approver
- employee policies
To send the email later:
- Go to Employees.
- Select the employee.
- Open Employee Details.
- Check the employee’s email address.
- Select Send invite email.
What the employee should do
The employee should open the welcome email and follow the instructions.
They can then access their TimeOff.Management account.
Once logged in, employees may be able to:
- view My Calendar
- check their leave allowance or PTO
- request leave
- check request status
- view Team View, depending on company permissions
- cancel or revoke leave where allowed
You can share the New employee guide to help them get started.
If the employee does not receive the email
Ask the employee to:
- Check their inbox.
- Check spam or junk folders.
- Confirm that the email address is correct.
- Check whether their company email system has blocked the message.
Admins should also open the employee profile and confirm that the saved email address has no spelling mistakes.
If the employee already has access
Do not create another employee profile.
Ask the employee to use the normal login page.
If they cannot remember their password, share: Forgotten password
When to send invitations
You may want to send welcome emails:
- as soon as each employee is added
- after the full company setup is complete
- to one department at a time
- shortly before your planned launch date
For a new company account, it is often easier to finish the main setup before inviting everyone.
This helps ensure employees see the correct schedules, allowance, leave types, and approval process when they first log in.
Related articles
-
Adding, editing, and deleting users Add employees and configure their department, location, schedule, manager, and allowance.
-
New employee guide Give employees a simple guide to calendars, leave requests, allowance, Team View, and account settings.
-
Forgotten password Help an employee regain access when they cannot remember their password.
Best practice
Check the employee’s email address and profile settings before sending the welcome email.
For a new company setup, invite employees only after their schedules, allowance, leave types, and approvers are ready.