
Custom fields on employee records
Every company records slightly different things about its people. A cost centre. A payroll reference. A badge number. A note about the equipment somebody has been issued.
Custom fields let an administrator define those details themselves, name them, and set the order they appear in. Once a field exists it can be filled in on each employee’s record, and it can be switched on as an extra column on the reports and in their CSV exports.
The job it does is a plain one: put your company’s own reference data next to your leave data, so a report can go straight to payroll or finance without anyone re-keying it from a spreadsheet.
Most of this article is about fields of type Text, which hold a value. A field of type File holds documents instead, on the employee record’s Documents tab, and is never a report column: read Documents on employee records.
Who can set them up
Custom fields are defined by administrators, in General settings. Filling in a value happens somewhere else entirely — on the employee’s own record, as part of editing that record.
Where to find them
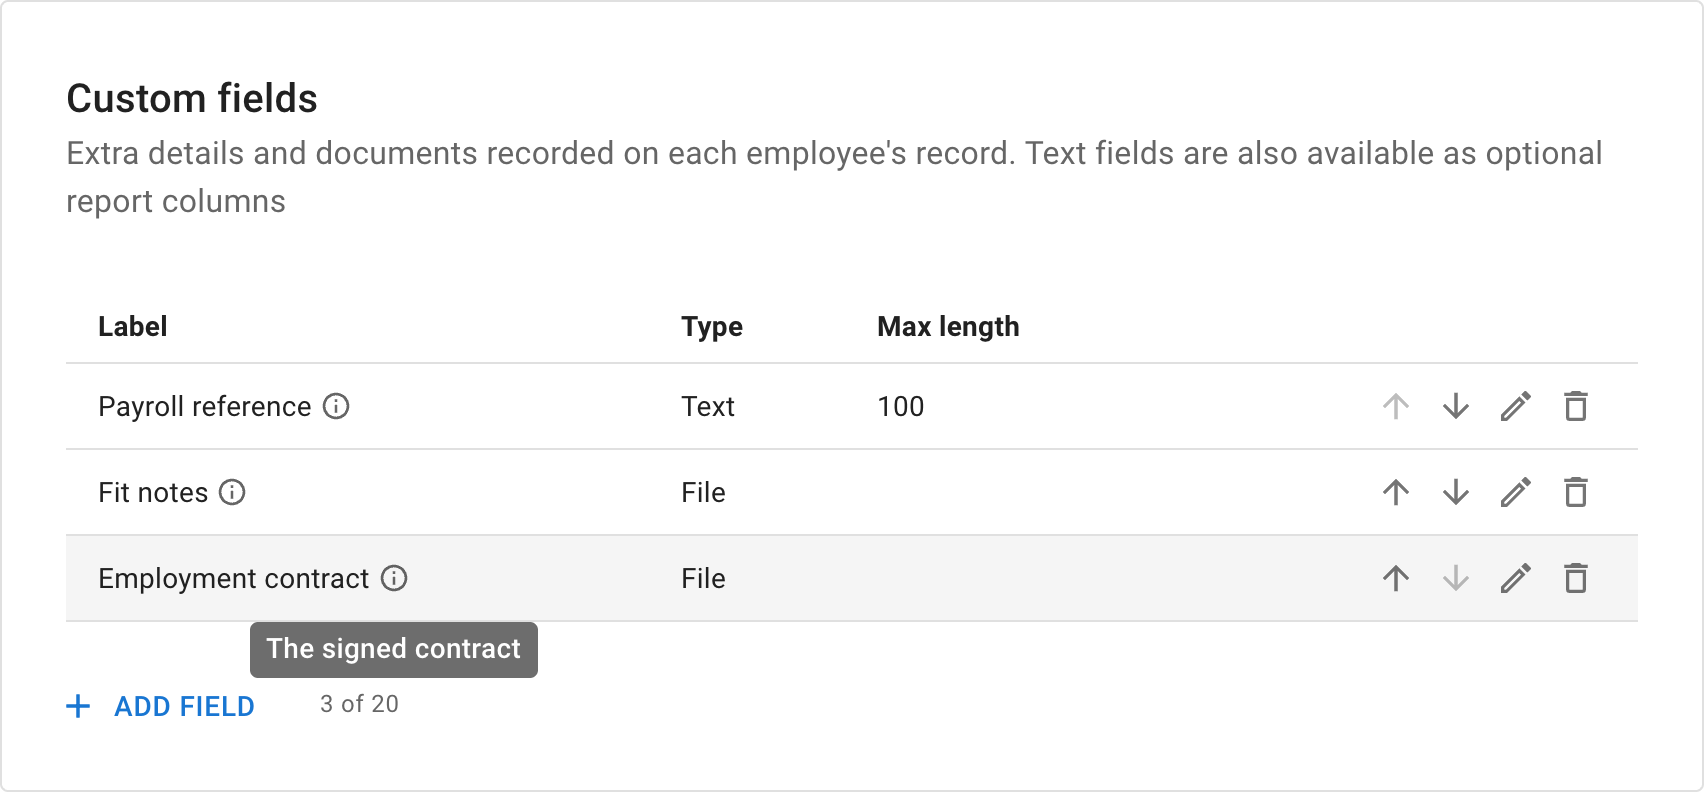
Open Settings → General settings. The Custom fields card sits below your company details, under a short line describing what its fields record on each employee’s record, and which of them can be report columns.
The card lists the fields you have defined so far. Each row shows the field’s Label, its Type and, for a Text field, its Max length, with a row of actions at the end: move up, move down, edit and delete. Where you have given a field a description, a small information icon sits beside its label — hover over it to read that description.
Add field creates a new one. The caption beside it tells you how many fields you have defined against the number your company may have; when you reach that number the button is disabled and explains why when you hover over it.
Before you have added anything, the card carries a short line inviting you to create your first field.
For the rest of what lives on that page, read General settings.
Create a field
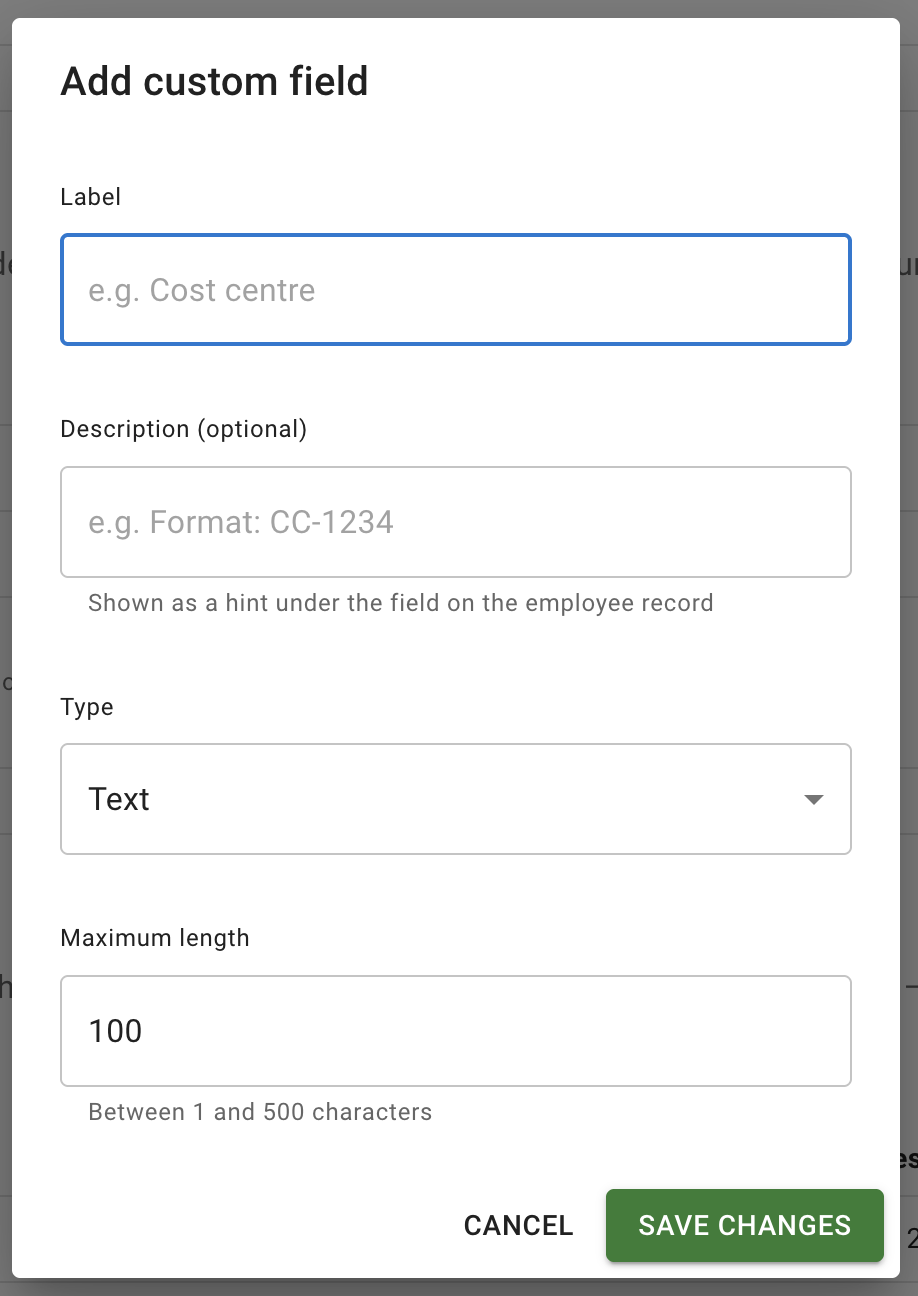
Select Add field. The dialog asks for:
- Label — what the field is called everywhere it appears: on the employee record and, for a Text field, in the reports’ column picker.
- Description (optional) — a hint shown under the field when somebody is filling it in on an employee’s record. Use it for the shape of value you expect, or for where to look the value up. Leave it empty if the label speaks for itself.
- Type — Text or File. A field’s type is settled when it is created: open the field again later and the control cannot be changed.
- Maximum length, for a Text field — how long a value in this field may be. The dialog states the range it accepts underneath the control.
Save changes creates the field and it joins the list on the card.
A field of type File holds documents rather than a value. In place of Maximum length, its dialog asks what The employee and Managers may do with the field’s documents. Read more: Documents on employee records
A new field starts empty. Creating it does not put anything on anybody’s record — somebody has to enter the values, employee by employee.
Fill in a value on an employee’s record
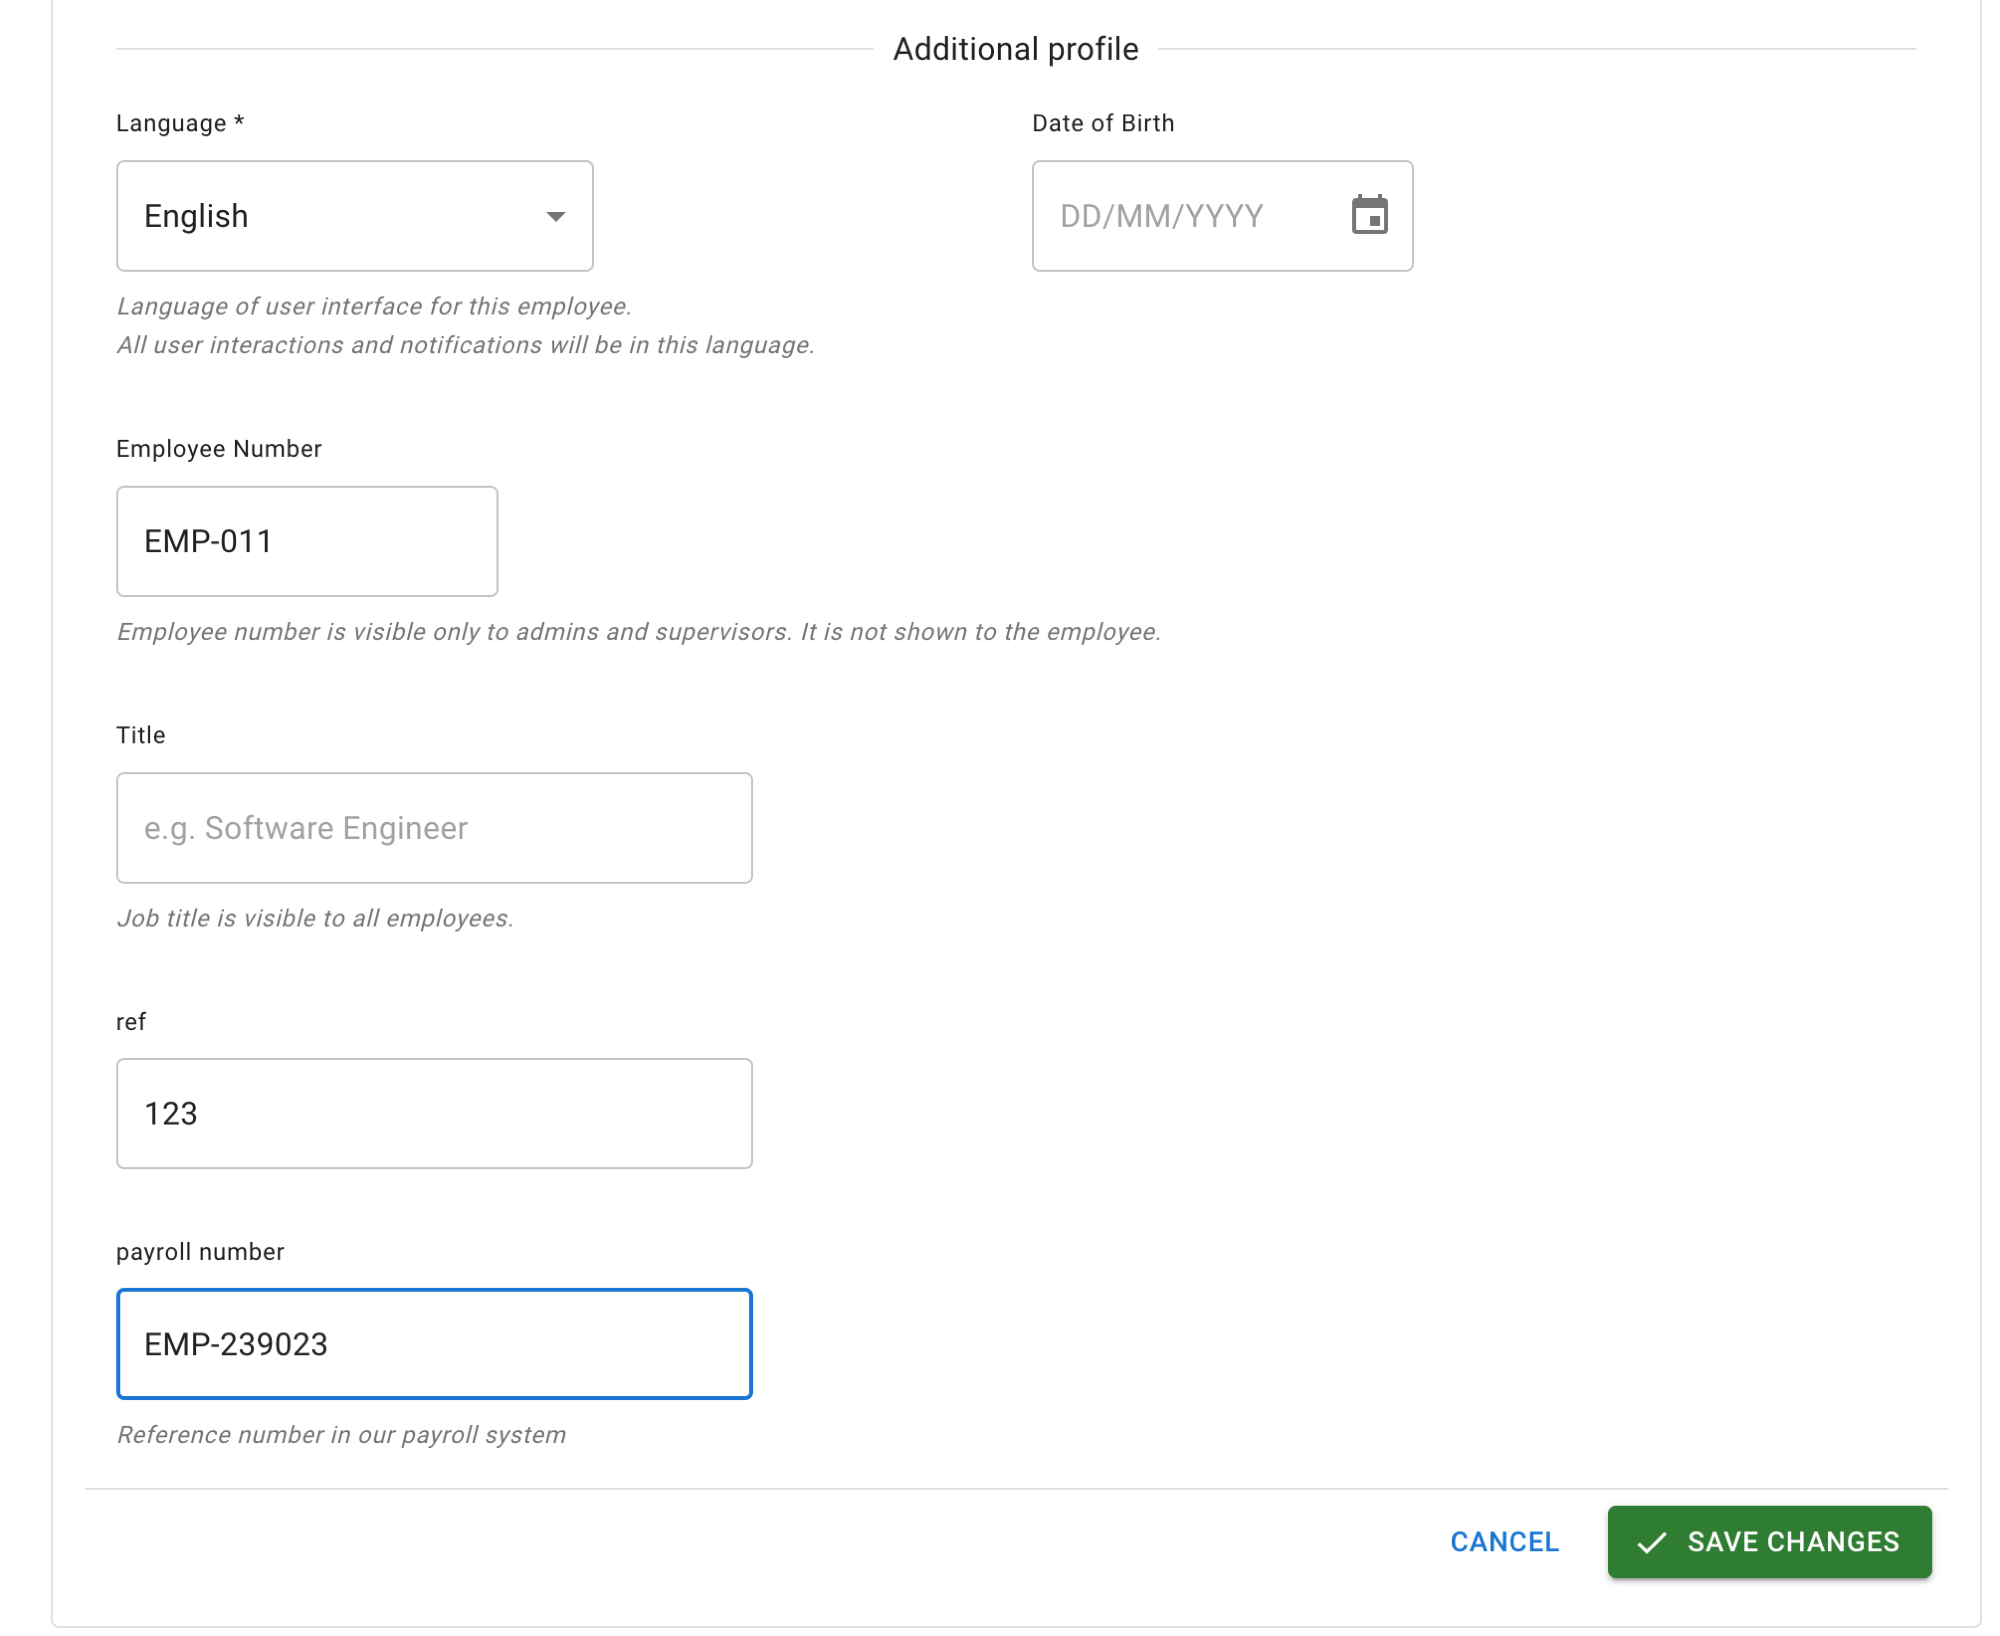
Open the employee from Employees and find the Additional profile section of their general details. Custom fields sit there, after the built-in profile details, in the order you set in settings. Fields of type File are not there: their documents are on the Documents tab.
Values are saved with the rest of the employee’s details — the same edit mode, the same Save changes button. There is nothing separate to save.
Reading and editing show different things, and the difference catches people out:
- Editing a record lists every field you have defined, empty ones included, each with its description underneath as a hint.
- Reading a record shows only the fields that have a value, exactly like the built-in optional details. An employee with nothing filled in shows nothing extra.
You fill custom fields in on a record that already exists. Add the employee first — that includes employees added in bulk or imported for you — then open the record and enter the values.
Edit, reorder and delete a field
Every row on the Custom fields card carries its own actions.
Move up and move down. The arrows set the order fields appear in, and that order is used everywhere — the employee record and the reports’ column picker both follow it.
Edit. Opens the same dialog you used to create the field, so you can change its label, its description and its maximum length. Renaming a field keeps everything already entered against it: only the label changes, the values stay where they are. The type stays as it was set.
For a field of type File, you change its access levels there instead of a maximum length.
There is one limit on lowering the maximum length: if employees already hold values longer than the new limit, the change is refused and the dialog tells you what needs to happen first. Shorten those values on the records that hold them, then come back and lower the limit.
Delete. Deleting a field removes it from every employee’s record and takes the values with it. This cannot be undone, and there is no way to get the values back afterwards. The confirmation dialog says so — read it before you confirm.
Deleting a field of type File also deletes every document stored in it, on every employee’s record. Its confirmation says how many documents the field holds.
Show a field as a report column
Custom fields can be added as columns to the reports that list employees:
- Allowance snapshot report
- Allowance usage by time
- Leave report
- Leave usage alert
Fields of type File hold documents, and are not available as report columns.
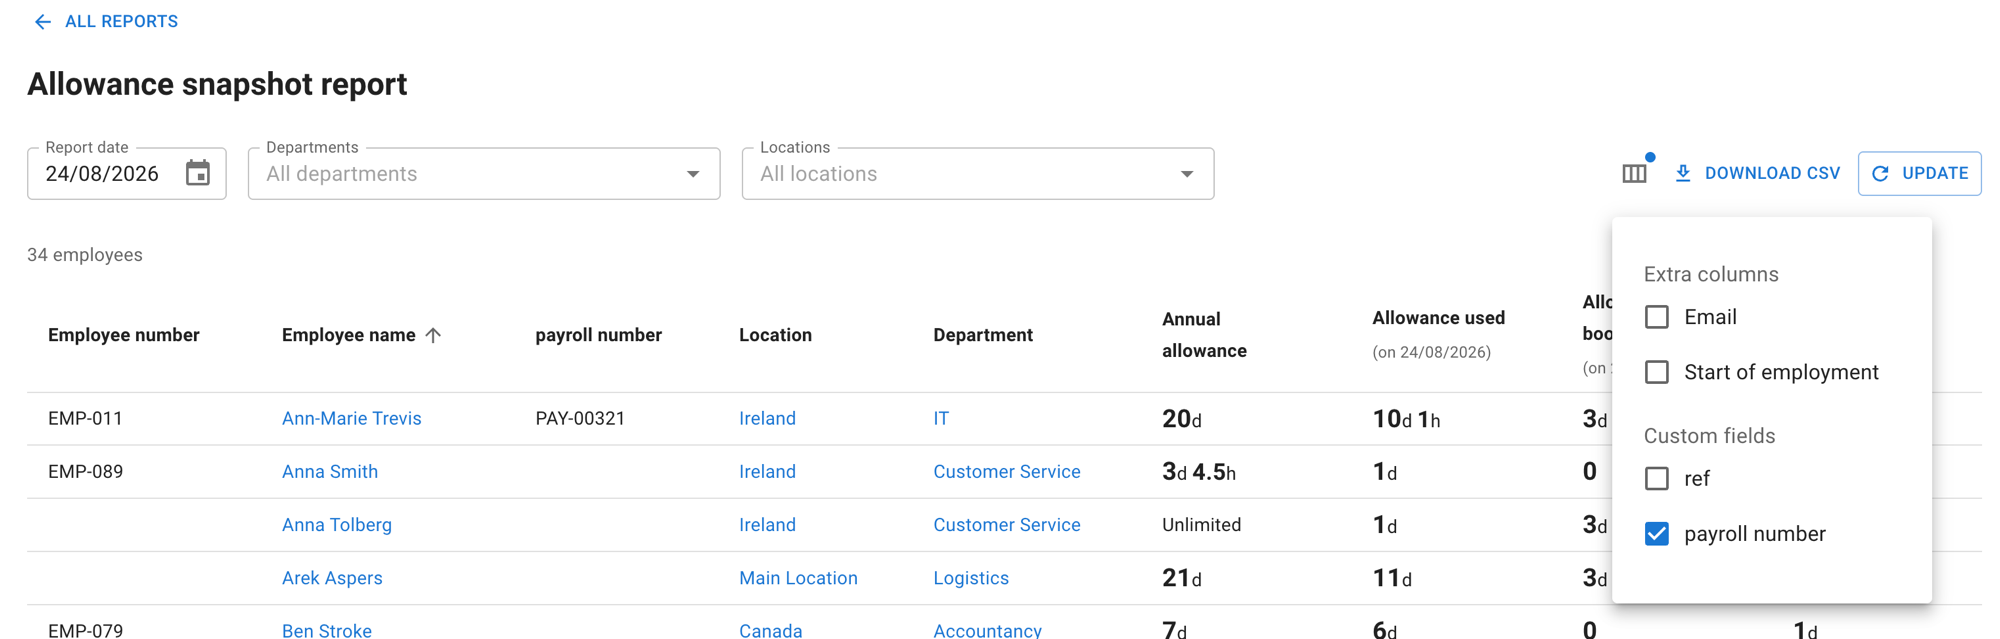
Each of those pages has a Columns control in its toolbar — the small column icon beside Download CSV and Update. Open it and you get a menu headed Extra columns, with your company’s custom fields grouped under Custom fields. Tick a field to add it as a column.
Three things worth knowing about report columns:
- The choice is yours alone, and it is remembered. Ticking a column changes what you see, not what your colleagues see, and it is still ticked when you come back to the report.
- The data arrives when you select Update, the same as every other change you make on a report page.
- The CSV export follows the columns on screen. Tick a custom field and it is in the download.
A custom column carries a cell for every employee in the report, and that cell is blank where no value has been entered.
For how the report pages themselves work — filters, Update, and the CSV — read Reports.
Who sees the values on an employee record
On an employee’s record, custom field values follow the same rule as the built-in Employee Number that sits above them: if you can see that on a colleague’s record, you can see their custom fields too. The record states that rule underneath the Employee Number field itself.
A field of type File has its own access, set on the field itself. Read Documents on employee records.
Good to know
A new field starts empty for everybody. Defining a field does not fill it in. It stays blank on an employee’s record until somebody enters a value there.
Values are entered on a record that already exists. Add the employee first, then open their record and fill the fields in — that is true however the employee arrived, including employees added in bulk or imported.
Renaming a field keeps the values. Change the label whenever the wording stops fitting; nothing already entered is lost.
Deleting a field is permanent. The field goes from every employee’s record and the values go with it. There is no undo.
A field’s type is chosen once. It is settled when the field is created and stays that way.
The maximum length cannot be lowered past values employees already hold. Shorten those values on the records that hold them first, then lower the limit.
Order is set in settings and used everywhere. The arrows on the Custom fields card decide the order on the employee record and in the reports’ column picker alike.
Blank cells in a report column are normal. Every employee in the report gets a cell in that column; it is empty for anyone whose record has no value.
Changes are recorded in the Audit trail. Changes to a field itself and changes to an employee’s values both appear there. Read more: Audit trail.