
Team view widget for office screens
The Team view widget puts your team’s leave on an office screen as a grid — a row for each person, a column for each day, and each person’s leave marked in the squares where it falls. It answers who is off, and when from across a room, in the shape people already know from a wall planner on the wall it replaces.
It is one of the widgets an office screen cycles through. Who is off — coming weeks carries the same leave as a list rather than a grid, so choosing between those two is a question of how your office likes to read it, not of what they can show. Bank holidays and events is a different thing again — it carries the office’s shared calendar rather than anyone’s leave, so it belongs alongside this widget rather than instead of it.
Read more: Office screens
This widget, and everything on this page, is administrators only. Employees never configure a screen — they only walk past it.
Team view the widget, and Team View the page
Two surfaces, near-identical names, and they are not the same thing:
- Team View is a page inside TimeOff.Management. Employees sign in to it, filter it, select a person, and book leave from it. Read more: Using Team View
- Team view is a widget on an office screen. Nobody signs in and nobody touches it. It shows whatever the administrator has decided that screen may show, and nothing else.
The capitalisation differs between them, and that is deliberate — the page is Team View, the widget is Team view.
Adding it to an office screen
Open the left-hand menu → Settings → Office screens, then open the screen you want it on, or select Add new to make one.
Select Add widget and pick Team view, which the picker describes as A grid of who is on leave, day by day, over the coming weeks. It appears as a card with its own settings, and can be moved up or down the screen’s widget list, or removed, like any other widget.
What appears on the board
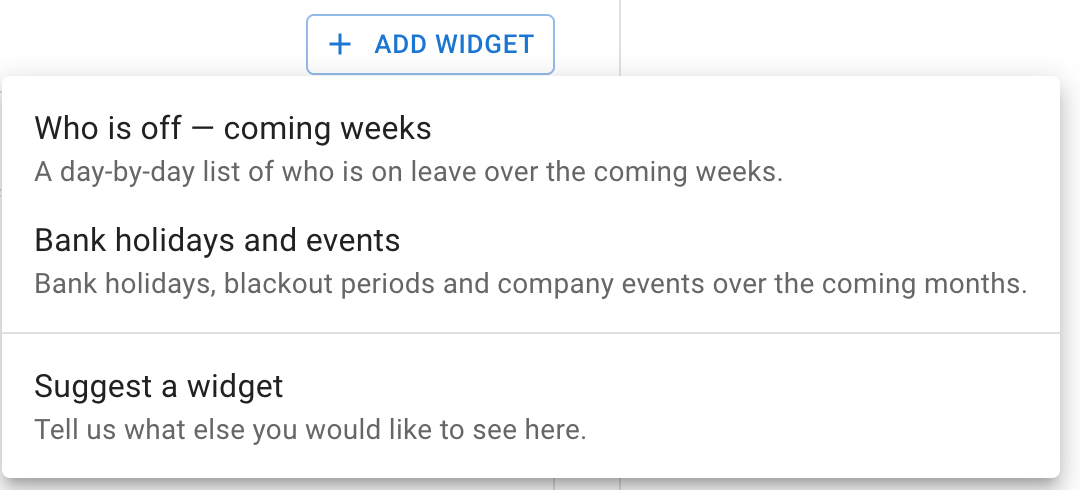
The board is headed with the widget’s name along with the horizon you set for it, and everything below that heading is the grid:
- A row for each person, a column for each day. The days are labelled and grouped by week.
- Only people with leave in the period get a row. Somebody with nothing booked does not appear at all.
- Leave fills the squares it covers, in that leave type’s own colour wherever the screen names the type — see Choosing how leave types appear. A part-day is shown as a split square rather than a filled one.
- Non-working days are shaded, so the working week reads clearly from a distance.
- Bank holidays are shaded on the rows of the people they apply to.
- The current day is marked, and days already past are played down.
- A count along the bottom, labelled Off, gives how many people the board is showing on leave that day.
- A key explains what each colour means.
Only approved leave appears. A request still waiting for a decision does not show on the wall.
The board covers the current week along with the period ahead, so the first columns may be days already gone.
Where there are more people than fit, the board pages through them and shows where it is in the sequence. It keeps cycling on its own — nobody has to go and touch the screen.
Choosing how far ahead the board looks
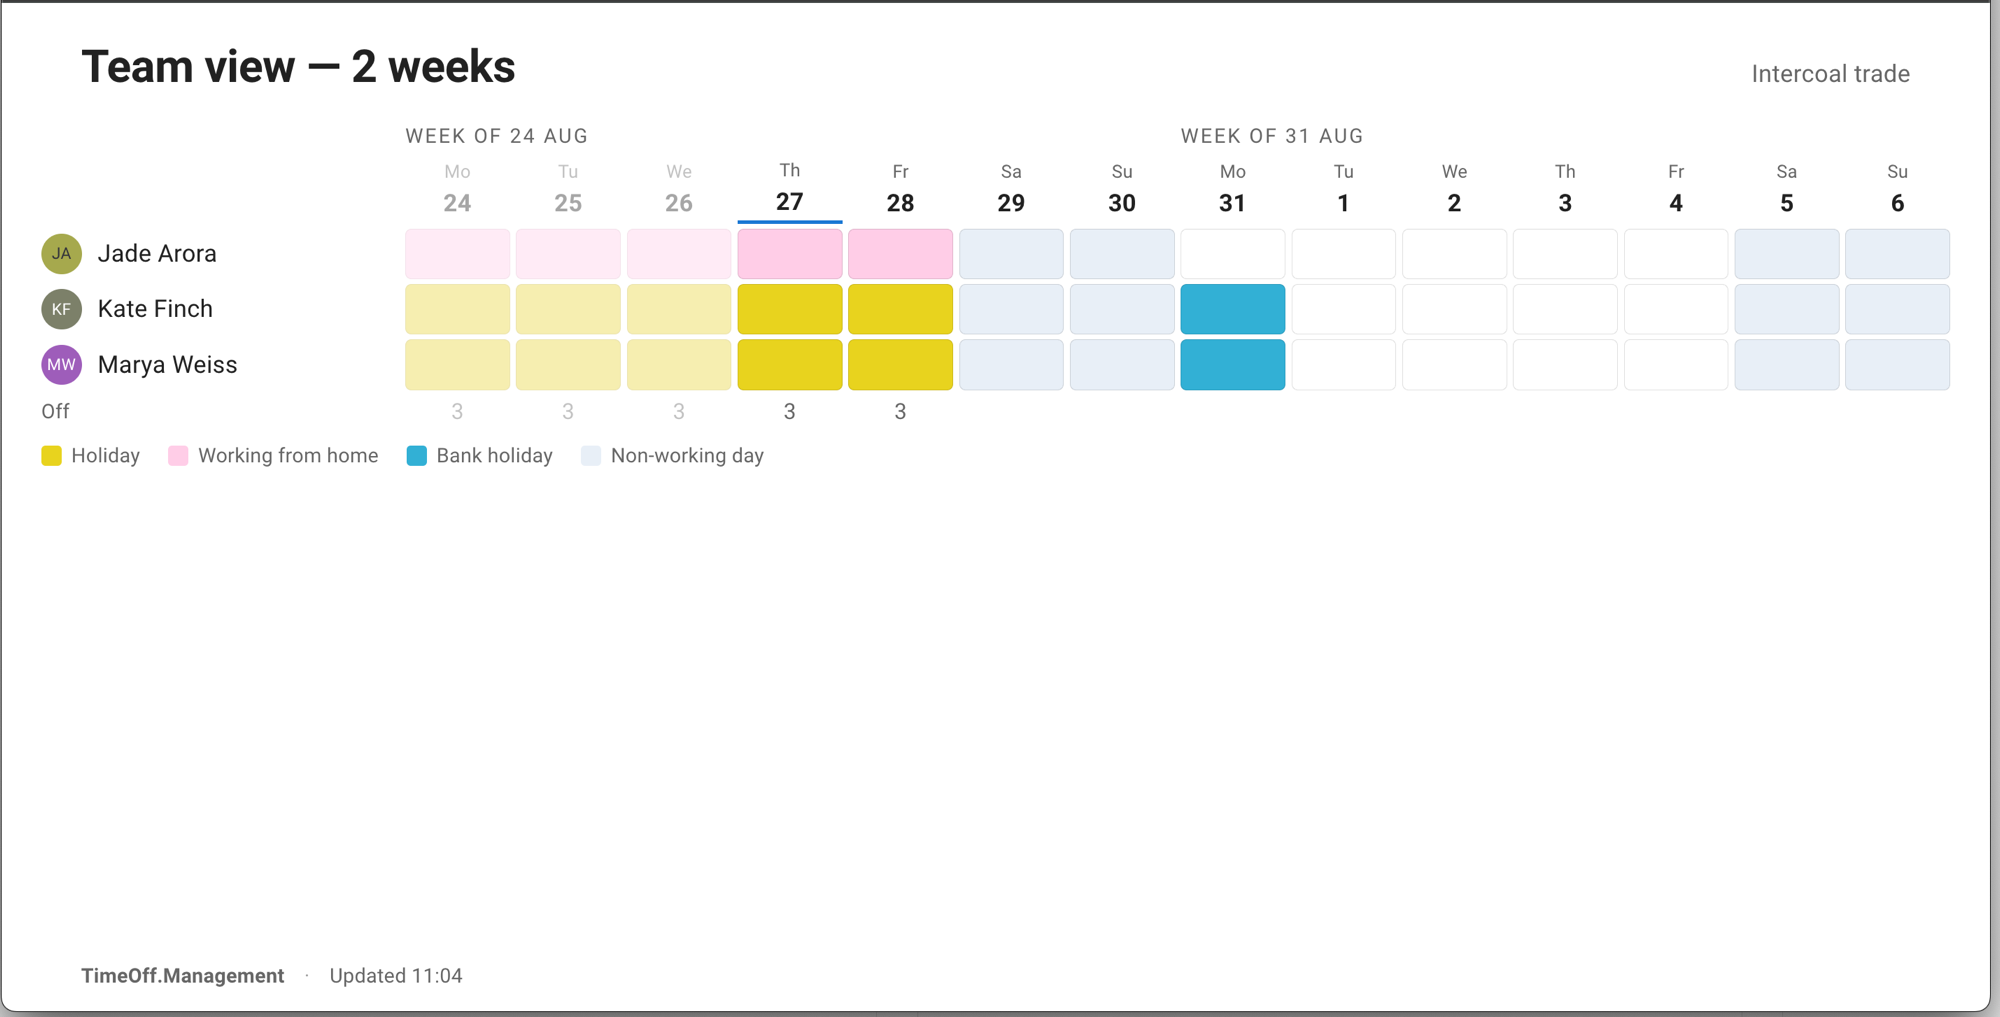
The widget’s card carries a Horizon — how far ahead this widget looks. You set it there, and the caption under the field tells you the values it accepts. It rolls forward with the date rather than covering a fixed block of the calendar.
Choosing who the board covers
This one is set on the screen, not on the widget — which is why administrators look for it on the widget’s card and do not find it.
Departments and Locations, under the screen’s Filters heading, decide who reaches every widget on that screen, this one included. They narrow each other rather than adding up, and a filter left empty means everyone, not nobody.
If the board is showing fewer rows than you expected, this is the first place to look.
Read more: Choosing who the screen covers
Choosing how leave types appear
This is the setting to think about before the board goes on a wall.
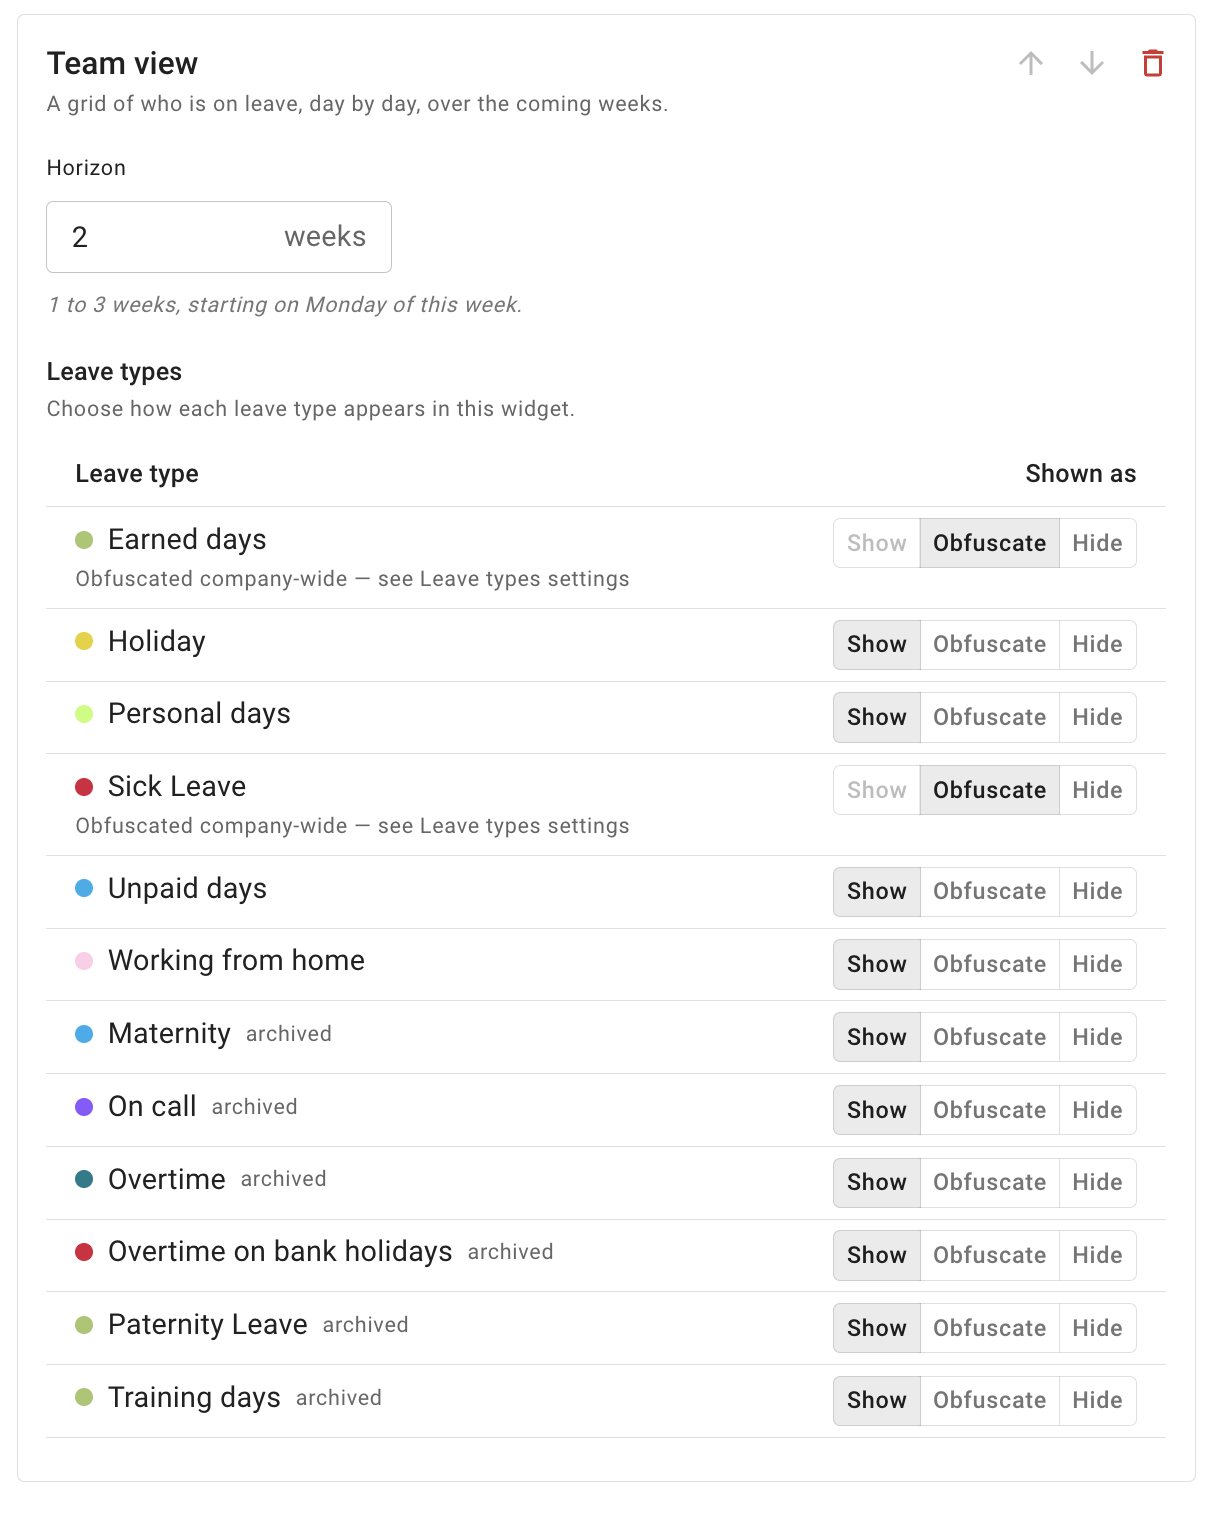
The card carries a Leave types table — Choose how each leave type appears in this widget. — with a row for each leave type and a Shown as column. For each leave type, pick one of three:
| Choice | What the board shows |
|---|---|
| Show | Leave of that type appears with the type named |
| Obfuscate | The person still appears as being off, without the leave type being named |
| Hide | Leave of that type does not appear on this screen at all |
Archived leave types appear in the table too, tagged archived.
Your company’s settings are a floor
An office screen can be stricter than your company-wide settings, never looser:
- A leave type your company already hides stays hidden on every office screen, and cannot be shown there.
- A leave type your company already obfuscates can be hidden on a screen, but cannot be named on one.
Where that is the case the row is locked and carries a caption saying so — Obfuscated company-wide — see Leave types settings — pointing you at the setting that decided it. If you are wondering why a particular leave type cannot be switched on, that is the answer, and the fix is a company-wide one rather than a screen one.
Read more: Leave types · Team View privacy modes
Decide it screen by screen
A board in a staff kitchen and a board in a customer-facing reception can reasonably want different settings, and the leave-type table is the tool for that difference. Set it per screen, deliberately, rather than leaving it as it came.
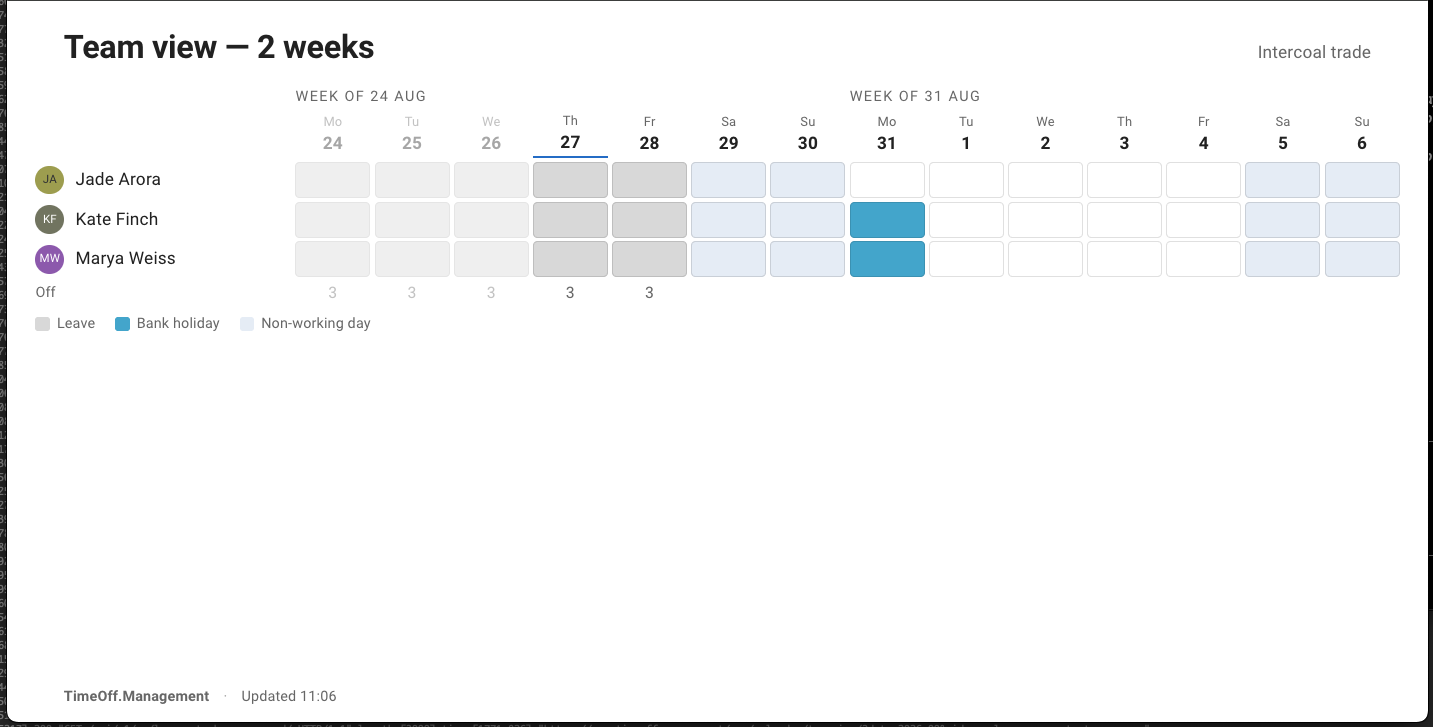
Below is the same board with its leave types set to Obfuscate. Same people, same days — the only thing that changed is what the board is willing to name.
Sharing the display link safely
A screen is opened on its display device with a display link, and the product says what that means next to the link itself:
Open this link in the browser of your TV or signage player. Anyone with the link can see what this screen shows, so share it only with the people setting up the display.
There is no login on a display and it does not ask who is looking, so the board shows what it shows to whoever walks past. Two things follow:
- Share the link only with whoever is setting the device up. If it gets out, regenerate it.
- Think about what the board shows before you decide where it hangs. That decision is the leave-type table above.
Read more: Looking after a screen
Common questions
My name is not on the board. Only people with leave in the period the board covers get a row. Somebody with nothing booked does not appear.
A leave request I made is not showing. Only approved leave appears on a board. A request still waiting for a decision does not.
The board shows a bank holiday for one person and not another on the same day. Bank holidays follow each employee’s location, and whether their department observes them. On a board covering more than one location or department, rows will legitimately differ. This looks like a bug and is not. Read more: Public holidays
A day is shaded as working when that person never works it. The shading comes from the company’s working week, not from each individual’s own working pattern.
A leave type is showing without its name. Either that leave type is set to Obfuscate on this screen, or your company obfuscates it everywhere — in which case its row is locked and no screen can name it. Check the widget’s Leave types table first, then your company’s leave type settings.
I cannot find Office screens in the menu. It is administrators only.