
Tagging employees
Departments and locations describe the shape of most companies, but not every group inside them. The contractors. The first-aiders. The remote staff. Each of those cuts across your departments and locations, and none of them has a box of its own.
Tags are labels an administrator defines themselves — a short name and a colour — and applies to whichever employees belong. An employee can carry several at once.
Once a tag exists it does two jobs. It shows on the employee’s record and in the Employees list as a coloured chip, so the grouping is visible where people already look. And it can be used to decide who a policy covers — which leave types a Leave Access policy grants, and who is in a Restrict leave overlap group — so the same grouping drives what those people may book, and how many of them may be away at once.
Name the group once, and the same tag does both jobs — instead of the same list of people kept by hand in two places.
Who can set them up and apply them
Defining tags and applying them are both administrators only. Administrators define tags in General settings; administrators apply them on an employee’s record. No other role can create, rename, recolour, redescribe, re-scope or delete a tag, and no other role can add one to an employee or take one away — not even roles that can otherwise edit that employee’s record.
Where to find them
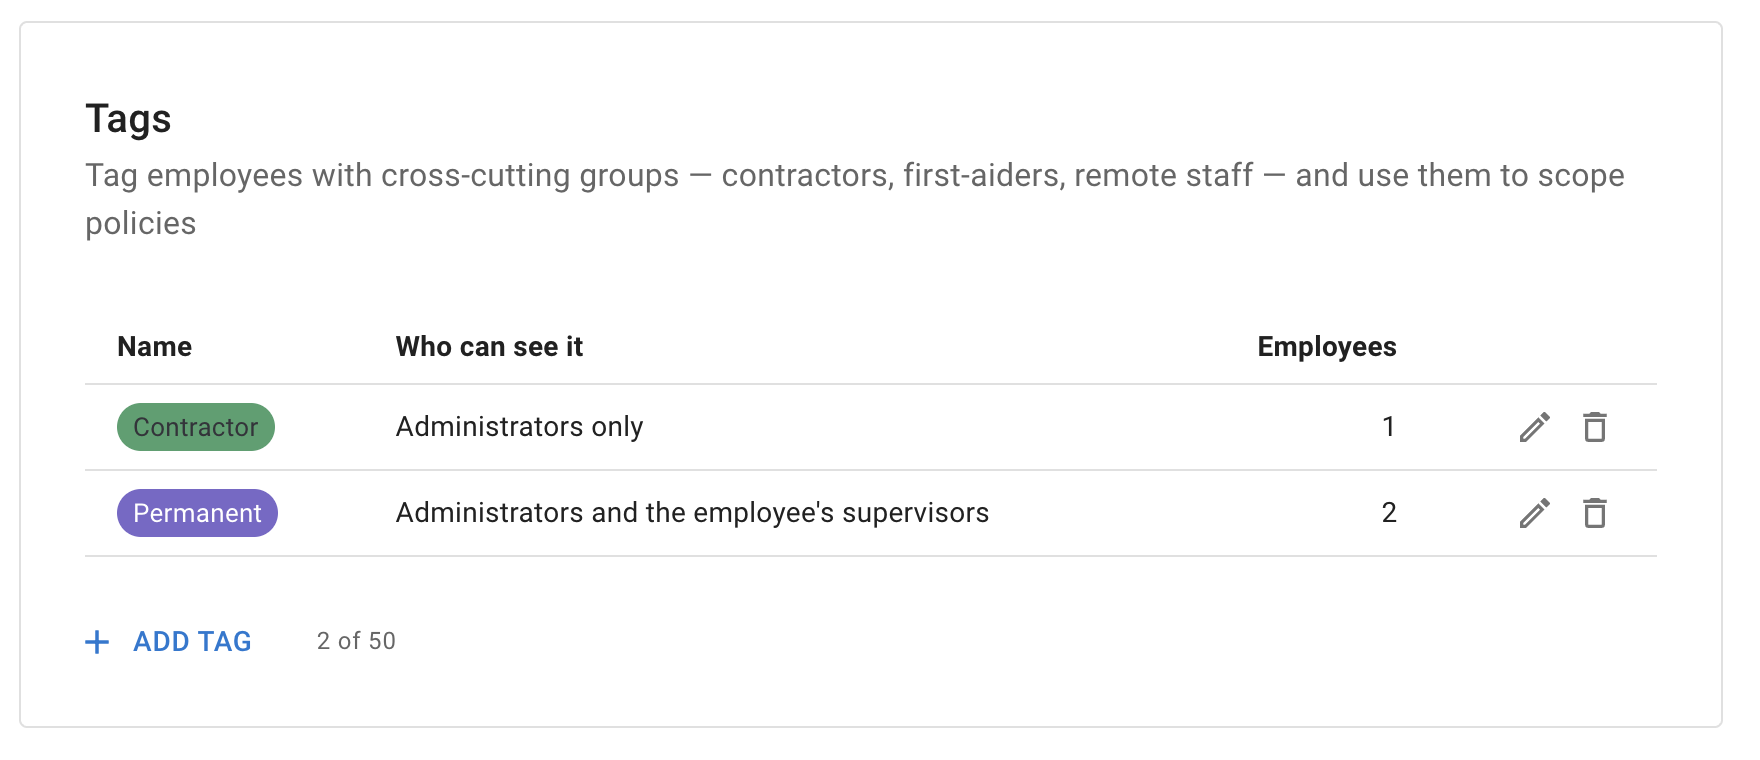
Open Settings → General settings. The Tags card sits below the Custom fields card, under a line describing tags as cross-cutting groups of employees — contractors, first-aiders, remote staff — that can also be used to scope policies.
The card lists the tags you have defined so far, under three columns:
- Name — the tag exactly as it appears everywhere else, in its own colour.
- Who can see it — the choice you made when you created the tag.
- Employees — how many people are carrying it at the moment.
Each row ends with an edit and a delete action. Where you have given a tag a description, hover over its name to read it.
Add tag creates a new one. The caption beside it tells you how many tags you have defined against the number your company may have.
Before you have added anything, the card carries a short line inviting you to create your first tag.
For the rest of what lives on that page, read General settings.
Create a tag
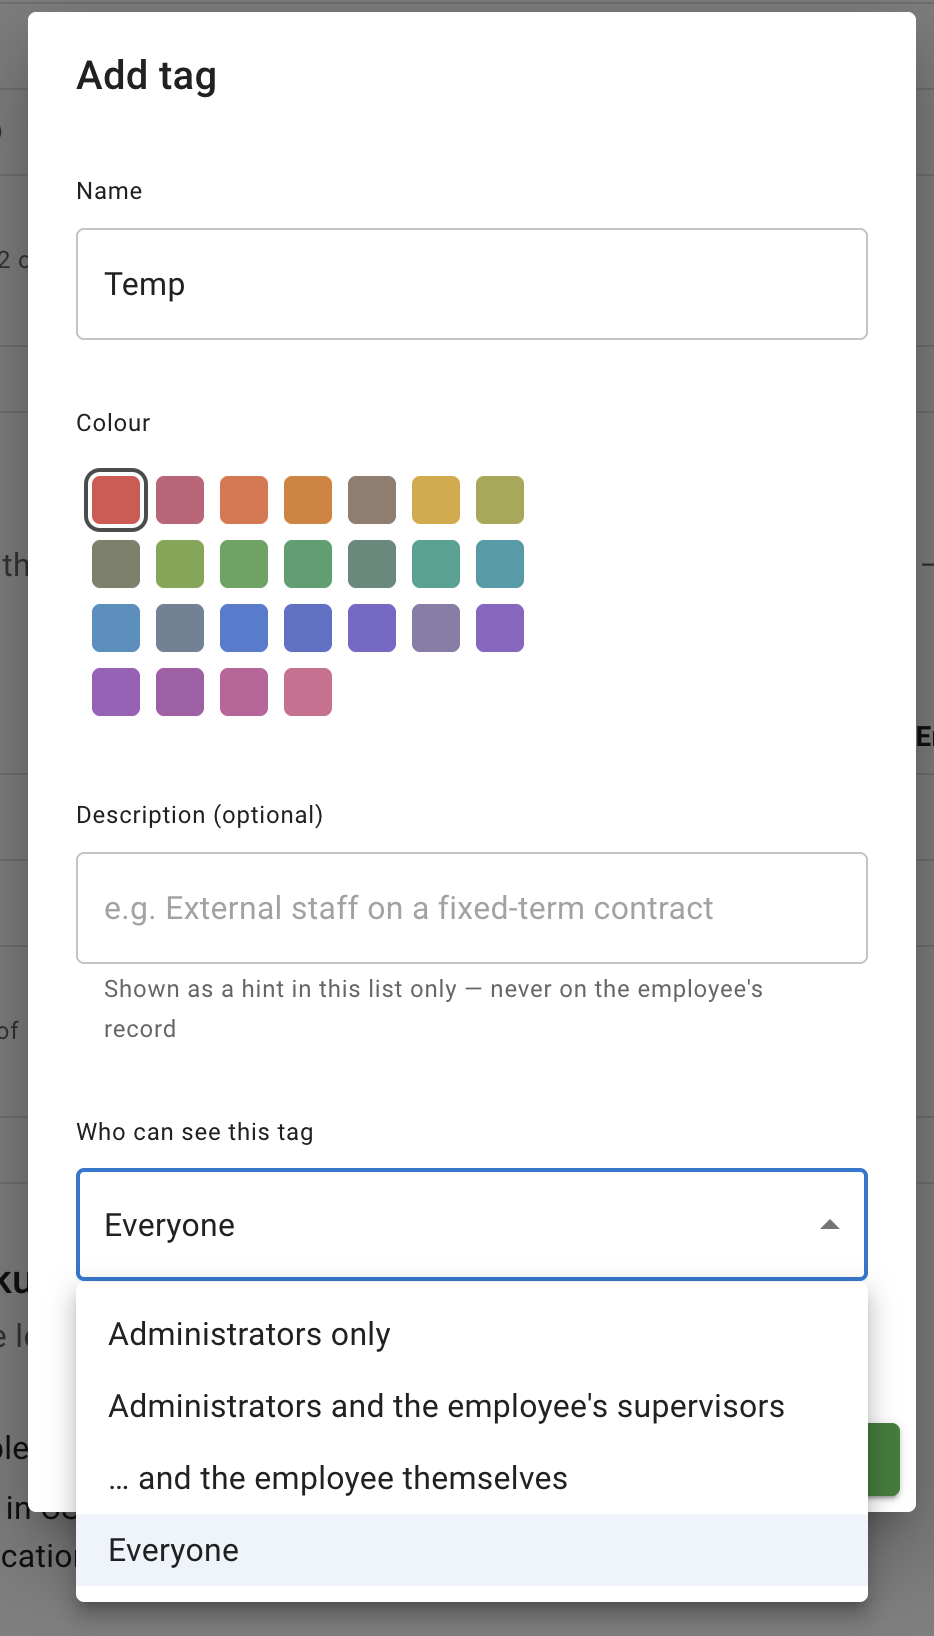
Select Add tag. The dialog asks for four things:
- Name — what the tag is called everywhere it appears.
- Colour — chosen from a fixed palette, the same one your employees’ avatars already use.
- Description (optional) — a note for whoever looks after these settings. The dialog states the rule underneath it: shown as a hint in this list only, never on the employee’s record.
- Who can see this tag — one choice from four, explained below.
Save the dialog and the tag joins the list on the card.
A new tag starts on nobody. Creating it does not apply it to anyone — an administrator applies it employee by employee afterwards.
Who can see this tag
Each tag carries its own answer to this question, chosen when you create it and changeable at any time. The four options run from narrowest to widest, and each wider one includes everybody the narrower ones include — which is why the third reads as a continuation of the second:
- Administrators only.
- Administrators and the employee’s supervisors.
- … and the employee themselves — that is, administrators, the employee’s supervisors, and the employee. In practice this widens what is shown on a record the employee can already open — because they supervise a department they also belong to, for example, or because their role lets them view everyone. There is no separate page where an employee sees their own tags.
- Everyone — anybody who can see that employee’s record at all.
This setting governs the chip — whether the coloured tag and its name are shown to somebody. It does not govern who a Leave Access policy applies to. See Good to know below.
Apply a tag to an employee
Open the employee from Employees. Their tags sit on the summary card at the top of the record, after the chips that already carry their department, location and status, with a small tag icon at the end of the row.
Select that icon. A panel opens showing the tags the employee already carries as chips, an Add a tag… box beside them, and the full list of your tags underneath.
- To add a tag, choose it from the list or start typing its name.
- To take one away, select the ✕ on its chip.
Changes are saved as you make them. There is no Save changes step for tags, unlike the rest of the employee’s details.
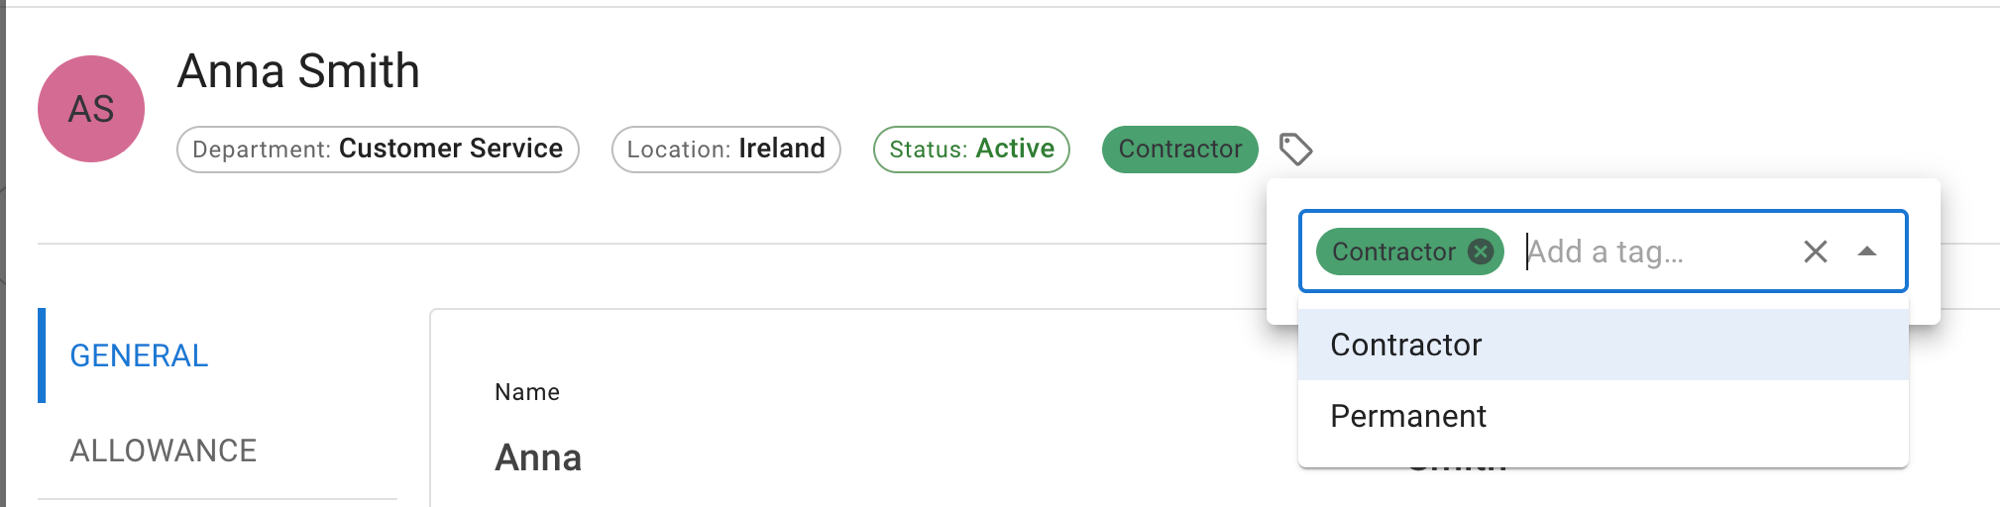
Only an administrator sees that control. Everybody else sees the tags on that record their own visibility allows, as plain chips, and nothing at all where none apply.
For the rest of the employee record, read Adding, editing, deleting users.
Where tags appear
On an employee’s record, as chips on the summary card at the top, in the colours you gave them.
On the Employees list, under each employee’s name and number — showing the tags visible to whoever is looking at the list.
Select a tag on the Employees list and the list filters down to the employees carrying it — a quick way to answer “who are our contractors?” without building a report.
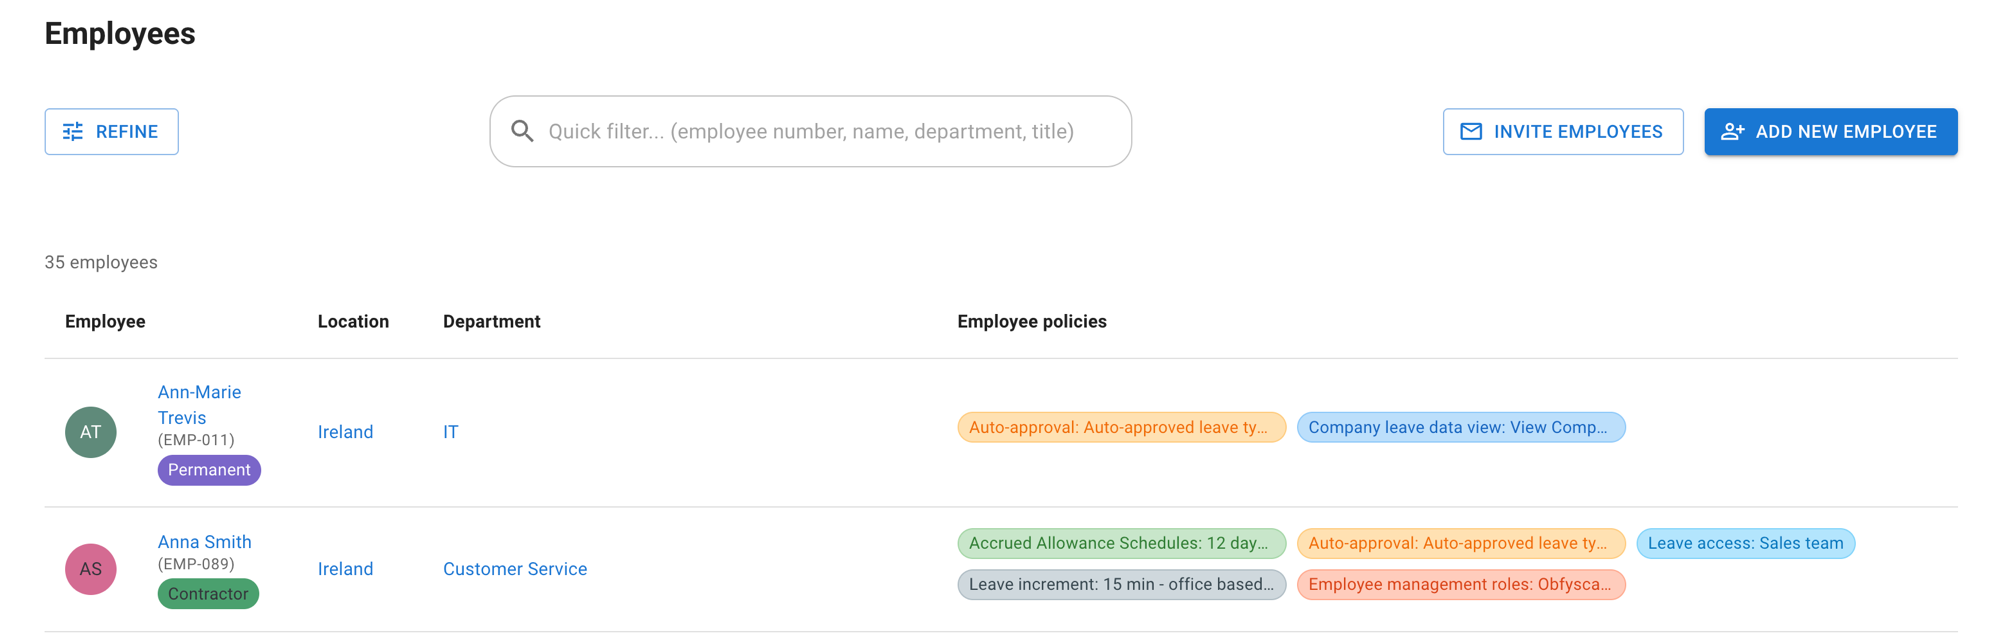
Wherever they are shown, tags are listed alphabetically.
Use a tag to scope a Leave Access policy
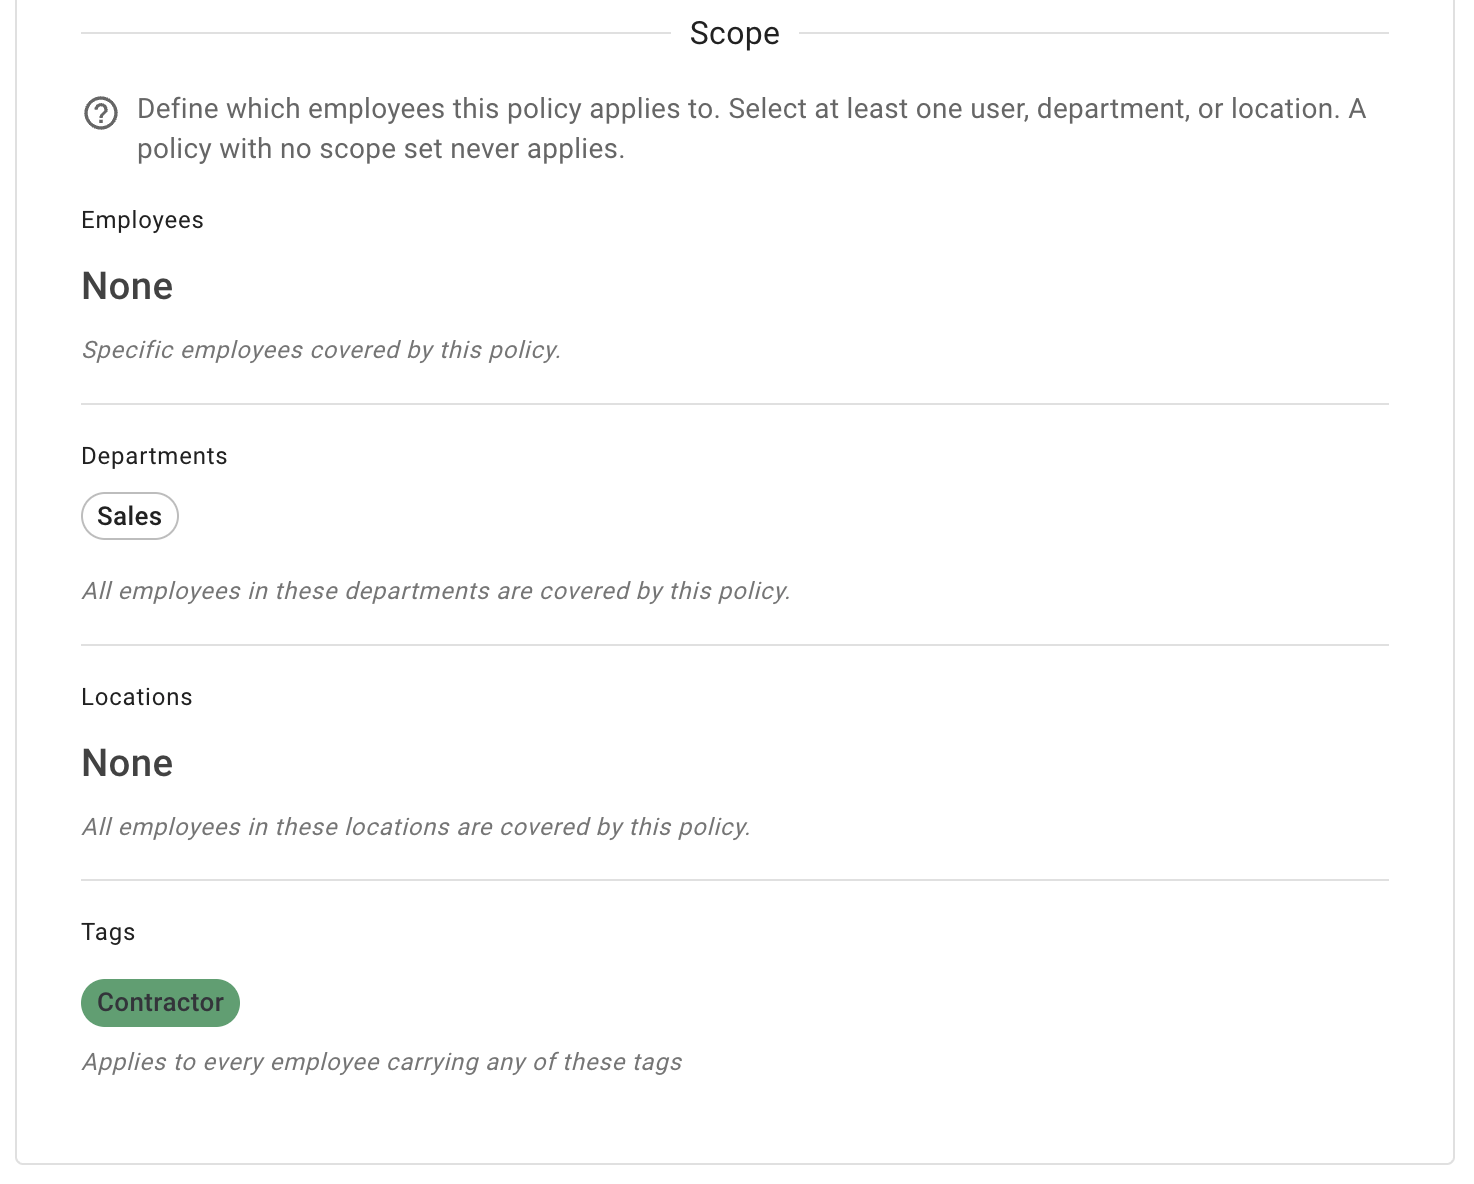
A Leave Access policy decides which leave types a group of employees may book. Its Scope section is where you say who that group is, and alongside Employees, Departments and Locations it now carries Tags.
Add a tag to the scope and the policy covers everybody carrying it. Add more than one and it covers everybody carrying any of them.
An employee is inside the policy for as long as they carry the tag, and drops out of it the moment the tag is taken away. That is the whole of what is new — everything else about setting up and reading a Leave Access policy works exactly as it did.
A Restrict leave overlap group is scoped the same way: its Scope block carries a Tags row alongside Employees, Departments and Locations, so a tag can also decide who counts towards a limit on how many people may be away at once. Read more: Restrict leave overlap
Read more: Employee policies — Leave access
Rename, recolour and delete
Every row on the Tags card carries its own actions.
Edit reopens the same dialog you used to create the tag, so you can change its name, its colour, its description and who can see it. Renaming or recolouring keeps everything else about the tag: the employees carrying it go on carrying it, and any policy scoped by it is untouched.
Delete is blocked while a Leave Access policy is scoped by that tag. You are told which policies are still using it, with a way to open them. Take the tag out of those policies first, then come back and delete it.
Once no policy is using a tag, it can be deleted — and that is permanent. It goes from every employee who was carrying it and from the settings card, and there is no way to get it back. The confirmation dialog says so; read it before you confirm.
Good to know
A new tag starts on nobody. Creating it does not apply it to anyone. It stays unused until an administrator adds it to employees, one record at a time.
Only administrators manage tags, and only administrators apply them. Nobody else can create, rename, recolour, redescribe, re-scope or delete a tag, or add one to an employee — even roles that can otherwise edit that employee’s record.
Renaming or recolouring a tag keeps everything. Who carries it and which policies use it are both unaffected.
A tag a policy is using cannot be deleted. Remove it from the Leave Access policies that reference it first; the delete is refused until you do, and tells you which ones to look at.
Deleting an unused tag is permanent. It disappears from every employee who carried it and from the settings card. There is no undo.
Who can see a tag governs the chip, not the policy. An employee whose visibility for a tag is set to administrators only can still have the leave types they may book narrowed by a Leave Access policy scoped to that same tag. The policy applies to them; they simply never see the tag that is the reason for it.
Tags are listed alphabetically wherever they are shown. There is no manual ordering to set.
Changes are recorded in the Audit trail. Creating, editing and deleting a tag all appear there, and so does a change to the tags an employee carries. Read more: Audit trail.